Thursday, February 19, 2009

Gnocchi with Tomato Cream Sauce and Turkey Meatballs

My inspiration for this dish came from a variety of sources. I used Giada's Marinara Sauce Recipe, but made some additions, I used the meatball recipe (except with turkey) from Rachel Ray's Chicken Parm Meatball Subs and I used De Cecco freeze dried gnocchi. It turned out pretty yummy. The meatballs were a bit dry. I think it was either due to using 99% fat free turkey or baking them in the oven longer than instructed because I wanted them to be a little browner on top.


This was our Valentine's Day dinner so I decided to make it more decadent by adding some half and half to the marinara sauce. When the meatballs were finished baking in the oven I added them to the sauce. I boiled the Gnocchi for 2 minutes (it cooks really fast) and added it to the sauce and meatballs too! I think over all it was a success and I would make it again with only a few minor adjustments. I really loved the Marinara sauce! I have never made my own and only would ever use the jarred variety. I'm not sure why! Making Marinara sauce is really easy, you just need to have some time for it to sit on the stove, but I hear it freezes well so I'm looking forward to having the batch that I froze with some yummy pasta in the near future:) I think next time I make meatballs I'll just suck it up and use beef...I think that will solve my dryness problem.


Here are the recipes!

Turkey Meatballs

1 1/2 pounds ground Turkey

1 tablespoon grill seasoning blend (recommended: Montreal Steak Seasoning by McCormick)

1 large egg

1 cup grated Parmigiano-Reggiano

1/2 cup Italian bread crumbs

Handful of chopped parsley leaves

Extra-virgin olive oil, for liberal drizzling

Preheat oven to 400 degrees. Place turkey in a bowl and season with grill seasoning. Add egg, half of the grated cheese, bread crumbs, parsley, and a serious drizzle of extra-virgin olive oil to the bowl. Mix meat together and roll into mini balls, 1 1/2 inches across, and arrange on a nonstick cookie sheet. Bake at 400 degree F for 10 to 12 minutes or until firm and lightly golden


Giada’s Marinara Sauce (I actually froze half of it...it makes A LOT!)
1/2 cup extra-virgin olive oil

2 small onions, finely chopped

2 garlic cloves, finely chopped

2 stalks celery, finely chopped

2 carrots, peeled and finely chopped

1/2 teaspoon sea salt

1/2 teaspoon freshly ground black pepper

2 (32-ounce) cans crushed tomatoes

2 dried bay leaves

1/2 cup half and half

In a large casserole pot, heat the oil over a medium-high flame. Add the onions and garlic and saute until the onions are translucent, about 10 minutes. Add the celery, carrots, and 1/2 teaspoon of each salt and pepper. Saute until all the vegetables are soft, about 10 minutes. Add the tomatoes and bay leaves, and simmer uncovered over low heat until the sauce thickens, about 1 hour. Remove and discard the bay leaf. Season the sauce with more salt and pepper, to taste. (The sauce can be made 1 day ahead. Cool, then cover and refrigerate. Rewarm over medium heat before using.)


Tuesday, February 17, 2009

Cauliflower Soup

I'm sorry for the lack of posting. The weekend rolled around and I just didn't get a chance to update the blog. I have to admit...on the weekends I try to limit how much time I spend on the computer due to the massive amounts of time I spend on here during the week! Anyway...one night last week I made Cauliflower Soup from the Pioneer Woman Cooks website. As usual with her recipes it did not disappoint! I followed it exactly as written. I served it with some of those Pillsbury frozen biscuits. They puff up a little funny in the oven, but they still taste yummy! Both Dave and I thoroughly enjoyed the soup! It made A LOT so I was able take it to work for lunch the next day and I also frozen a portion of it (although I'm unsure of how well this will freeze...I'll keep ya posted!)


We enjoyed the soup with some Frontera Chardonnay which is inexpensive, but still pretty tasty!


Sorry for the blurry pictures...my camera's battery is dying and I seemed to have misplaced my charger! :(


This is Willow! She has taken to playing and rolling around right under my feet!


And this is Willow's Tail...It's huge and puffy (and Dave's feet...I think he was doing the dishes:))

I listed the recipe below...but I highly recommend you go here and see the beautiful step by step pictures that the Pioneer Woman posted. She's an amazing photographer (and cook!)


PW’s Mom’s Cauliflower Soup

1 stick butter
1/2 onion, finely diced
1 carrot, finely diced
1 celery stalk, finely diced
1 to 2 heads cauliflower, roughly chopped
2 tablespoons chopped fresh or dried parsley
2 quarts low-sodium chicken broth or stock
2 cups whole milk
6 tablespoons flour
1 cup half & half
2 to 4 teaspoons salt, to taste
1 generous cup sour cream, at room temperature


Directions

1. In a large soup pot or dutch oven, melt 4 tablespoons butter. Add the onion and cook for a few minutes, or until it starts to turn brown. Add the carrots and celery and cook an addition couple of minutes. Add cauliflower and parsley and stir to combine. Cover and cook over very low heat for 15 minutes.

2. After 15 minutes, pour in chicken stock or broth. Bring to a boil, then reduce heat and allow to simmer.

3. In a medium saucepan, melt 4 tablespoons butter. Mix the flour with the milk and whisk to combine. Add flour-milk mixture slowly to the butter, whisking constantly. Remove from heat and stir in 1 cup half & half.

4. Add mixture to the simmering soup. Allow to simmer for 15 to 20 minutes. Check seasoning and add more salt or pepper if necessary.

5. Just before serving, place the sour cream in a serving bowl or soup tureen. Add two to three ladles of hot soup into the tureen and stir to combine with the sour cream. Pour in remaining soup and stir.


Serve immediately.

Thursday, February 12, 2009

Box wine and Leftovers! Yum! :)


Tonight consisted of Tater Tot Casserole and leftovers (which were MUCH better leftover), Pinot Grigio (boxed--for me...Dave opted for water instead!) and American Idol from last night and tonight. A very enthralling evening if ya ask me:) haha. The box wine definitely classed it up...don't worry, I don't normally drink wine in a box. I gave that up in college, but I thought I'd try it again since Target started making those incredibly cute cubes that are pretty damn good! This brand isn't horrible, not nearly as bad as FRANZIA (ewwwwy!)...and it's very cost effective:) Recession wine!


Winston says hi!

Wednesday, February 11, 2009

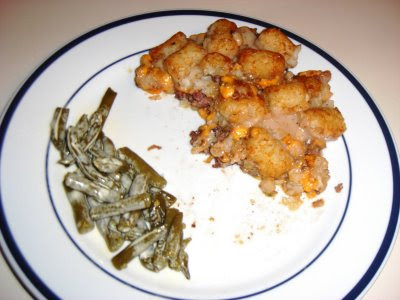
Tater Tot Casserole


I found this recipe on Cooking Claire's blog a few weeks ago and starred it in my googl reader to make at some point down the line. Well last night was the night! I never had or even heard of Tater Tot Casserole, but having a fond memory of Tater Tots from those wonderful public school lunches growing up, I knew it had to be good!

I was unsure (again) whether or not I was supposed to brown the ground beef first, but after googling other Tater Tot Casserole recipes I noticed that many of them don't brown the beef first--so I didn't either. I also used deli sliced cheddar cheese (as suggested) rather than shredded. All in all it turned out pretty yummy and was very simple to make. Dave said he liked it too even though he had to take it to go since I got a late start cooking (I got sucked into updating my blog:)) and he had to be at work on the film set by 10pm.

Even though this version was good, next time I would brown the beef in a skillet first, just to make it more crumbly and also to drain off the fat (it was a little greasy). I also think I would layer it in the order of beef, soup, cheese, taters rather than what this recipe calls for which is beef, cheese, soup, taters. The beef really didn't get to meld with the mushroom soup because the cheese was reating a barier and I think the flavor would have been better if the soup and the beef had cooked together. But that's just me...and what do I know?:)

Here is the recipe from last night:


Tater Tot Casserole
  • 1 lb groung beef
  • Salt, pepper, garlic powder, onion powder
  • Cheddar cheese--sliced or shredded
  • I can cream of mushroom soup
  • Frozen Tater Tots
Directions

In an 11x7 pan, crumble or spread ground beef. Sprinkle salt, pepper, garlic powder and onion powder on top of beef. Cover with sliced or shredded cheddar cheese (NOT American cheese...real cheddar). Spread can of cream of mushroom soup over the cheese layer (this can be tricky business if you've used shredded cheese). Top wtih tater tots. Cover with foil. Bake at 350 for 1-1/2 to 2 hours, uncovering for last 30 minutes. Or bake at 375 for one hour, uncovering for last 30 minutes.


Tuesday, February 10, 2009

Chicken and Dumplings

Well here is my first post on this good old (well new) blog. Last night I made Rachel Ray's Recipe for Chicken and Dumplings (with a few slight modifications). I persevered through Dave's attempts to convince me to switch up the weekly menu and make a different item that was listed. I was really in the mood for this comfort food classic so I made the authoritative decision that we were sticking with the original plan! I mean who doesn't like Chicken and Dumplings anyway!!!??

When I read the recipe I was unsure as to whether or not you were supposed to cook the diced chicken first or add it raw. I decided to be risky and just go ahead and add it raw since the mixture I was pouring it into was boiling. I diced the chicken first before chopping any vegetables. I cut it up into very small pieces so they would could quickly. I then put all of the pieces in a bowl and sprinkled the raw meat with salt, pepper, garlic powder and onion powder mixing it all together with a spoon to disperse over the meat. Another modification was that I used the Bisquick biscuit mix (adding in dried parsley and garlic powder) rather than the Jiffy box mix. They were just as tasty! Lastly I poured in about half a cup of half and half at the very very end...because you know, why not! :) It was super yummy and will be added to my file of super yummy recipes (as opposed to my other files which contain "not so yummy" and "kinda yummy" recipes...although I'm not even sure why I'm keeping a "not so yummy" file...hmm I may need to eliminate that one!) Here is a picture (I didn't take any last night!) I took with my iphone of the leftovers I ate for lunch today -- They reheated VERY nicely...even if the picture isn't quite so nice:)

So without further ado...the recipe (with my modifications)

Chicken and Dumplings
  • 1 and 1/2 pounds chicken breasts (you could get away with just 1 pound, there was A LOT of chicken)--sprinkled with salt, pepper, onion powder and garlic powder
  • 1 tablespoon olive oil
  • 2 tablesppons butter
  • 1 russet potato, peeled and diced
  • 2 medium carrots, peeled and diced
  • 1 medium onion, chopped
  • 1 rib celery, diced
  • 1 bay leaf, fresh or dried
  • Salt and pepper
  • 1 teaspoon poultry seasoning
  • 2 tablesppons flour
  • 1 quart chicken broth or stock (I used Kitchen Basics and it was good)
  • Bisquick mix (follow directions on box and add some dried or fresh parsley flakes and garlic powder
  • 1 cup frozen green peas
  • 1/2 cup half and half
Directions
  • Dice chicken into very small bite size pieces, sprinkle with seasonings and set aside. Wash hands
  • Place a large pot on stove over medium high heat. Add oil, butter, vegetables and bay leaf and cook 5 minutes, stirring frequently
  • Season mixture with salt, pepper and poutry seasoning. Add flour to the pan and cook 2 minutes. Stir broth or stock into the pot and bring to a boil. Add chicken to the broth and stir
  • Place biscuit mix in bowl and complete as directed on box (add in parsley and garlic powder too). Drop tablespponfuls (or smaller-I like my dumplings more bite sized) of prepared mix into the pot, spacing dumplings evenly. Cover pot tightly and reduce heat to medium low. Steam dumplings 8 to 10 minutes. Remove cover and stir chicken and dumplings to think sauce a bit. Stir peas into the pan and then add the half and half. Remove from heat and serve in shallow bowls